Tuesday, December 31, 2013

Pepper Jelly and Cream Cheese Spread

I had to sneak in one more recipe for the year! This appetizer is about as easy as you can get. We had it at both Thanksgiving and Christmas dinner and everyone loved it. It would also be a good New Year's Eve snack and you still have time to make it! You can use any kind of spicy jelly. I found mine next to all the other jelly at the grocery store. I tried different crackers, but Wheat Thins worked the best. Cream cheese is still thick even when it's soft and some of the other crackers just kept breaking.

Pepper Jelly and Cream Cheese Spread
1 8oz brick of cream cheese, room temperature
1 jar of pepper jelly (you only need about 3/4 a cup)
Crackers

1. Place the cream cheese brick on a serving plate.
2. Open your jar of jelly and stir vigorously until it becomes pourable/spreadable.
3. Pour about 3/4 a cup (half of 12oz. jar) onto brick of cream cheese and spread to cover the top. It will fall down the sides which is fine.
4. Serve with crackers.


I used Mango Peach Jelly...loved it.

 For Christmas, I cut the brick diagonally and made a Christmas tree complete with yellow pepper star.

Thursday, December 26, 2013

Cinnamon Toast White Chocolate Pretzels

We tried a new treat for Christmas that was easy and so good. Some of candy I like to make is a little time consuming, so I was glad to find this recipe because you can have these done in less than 5 minutes. They are definitely not just a holiday snack either, they would be fun to make any time!

Cinnamon Toast White Chocolate Pretzels
adapted from yourhomebasedmom.com
1 bag (15 oz) pretzels
2/3 c oil
1/3 c sugar
1 1/2 tsp cinnamon
Extra cinnamon sugar for sprinkling
White chocolate or almond bark for drizzling, melted

1. In a small bowl, whisk together oil, sugar, and cinnamon.
2. Dump pretzels into a large microwave safe bowl and pour oil mixture in. Stir until coated. Microwave for 1 minute, remove and stir. Microwave 45 seconds more.
3. Spread pretzels in a single layer onto two lined cookie sheets.
4. While still warm, sprinkle cinnamon sugar generously. Drizzle chocolate over cooled pretzels. Once chocolate has hardened, store in an airtight container.

Monday, December 23, 2013

Quick Pie Crust

When I want to make an easy pie crust I use the Crisco shortening pie crust recipe. Shortening is more solid at room temperature than butter, which cuts out the dough chilling time, and produces a flaky crust. I've used this for pot pie and quiche too.

Quick Pie Crust
crisco.com
Single Crust
1 1/3 cups flour
1/2 tsp salt
1/2 cup well-chilled shortening
3 to 6 TBSPs ice cold water

Double Crust
2 cups flour
1 tsp salt
3/4 cup well-chilled shortening
4 to 8 TBSPs ice cold water

1. Blend flour and salt in medium mixing bowl.
2. Cut chilled shortening into 1/2-inch cubes. Cut in chilled shortening cubes into flour mixture, using a pastry blender, in an up and down chopping motion, until mixture resembles coarse crumbs with some small pea-sized pieces remaining.
3. Sprinkle half the maximum recommended amount of ice cold water over the flour mixture. Using a fork, stir and draw flour from bottom of bowl to the top, distributing moisture evenly into flour. Press chunks down to bottom of bowl with fork. Add more water by the tablespoon, until dough is moist enough to hold together when pressed together.
4. Shape dough into a ball for single pie crust. Divide dough in two for double crust or double deep dish crust, one ball slightly larger than the other. Flatten ball(s) into 1/2-inch thick round disk(s). If needed, wrap dough in plastic wrap and chill for up to two days.
5. Roll dough from center outward with steady pressure on a lightly floured work surface into a circle 2-inches wider than pie plate for the bottom crust. Transfer dough to pie plate by loosely rolling around rolling pin. Center the rolling pin over the pie plate, and then unroll, easing dough into pie plate.
6. For a SINGLE pie crust, trim edges of dough leaving a 3/4-inch overhang. Fold edge under. Flute dough as desired. Bake according to specific recipe directions.
7. For a DOUBLE pie crust, roll larger disk for bottom crust, trimming edges of dough even with outer edge of pie plate. Fill unbaked pie crust according to recipe directions. Roll out smaller dough disk. Transfer dough carefully onto filled pie. Trim edges of dough leaving a 3/4-inch overhang. Fold top edge under bottom crust. Press edges together to seal and flute as desired. Cut slits in top crust or prick with fork to vent steam. Bake according to specific recipe directions.

Friday, December 20, 2013

Pear Pomegranate Salad

This is the salad we had for Thanksgiving this year, and I think we're going to have it again for Christmas dinner. I got this recipe from an Our Best Bites cookbook, and changed it just a tad. I used bottled dressing instead of making my own, left out a lime, used red leaf instead of romaine, and sugar coated my pecans in the oven. Loved the salad especially the pomegranate seeds which I never buy, so they made it exciting. :) 

Pear Pomegranate Salad
adapted from Our Best Bites
1 head red leaf lettuce, washed and chopped/torn
1 (14 oz) bag baby spinach
Seeds from one pomegranate
2 ripe pears, chopped or thinly sliced
4 oz feta cheese, crumbled
1/2 cup sugared pecans
Dressing ( I used half balsamic vinaigrette, half poppy seed)

Combine and toss salad ingredients. Drizzle on dressing. Serve immediately.

Notes:
This recipe makes a lot of salad, so I would recommend only putting the dressing on what you think will be eaten immediately. An easier route would be to put all the ingredients out and have people design their own salad.

Another dressing that would be good with this salad is this Red Wine Poppyseed Dressing.

The fastest way to sugar pecans is to combine 1/2 cup pecans and 1/4 cup sugar in a skillet and stir until sugar melts over med low heat for about 15 min. I like to do mine ahead of time in the oven. Using the following method.

Sugar Coated Pecans
1 egg white
1 T water
1/2 pound pecan halves
1/2 cup sugar

Preheat oven to 250 degrees. Grease one baking sheet. In a mixing bowl, whip together the egg white and water until frothy. Add pecans to egg whites, stir to coat the nuts evenly. Remove the nuts, and toss them in the sugar until coated. Spread the nuts out on the prepared baking sheet. Bake  for 1 hour, stirring every 15 minutes.

Friday, December 6, 2013

Pumpkin Pie

I finally made a pumpkin pie! I am not a fan of pumpkin pie, but my daughter likes it and I wanted to have one for guests at Thanksgiving. My mom has always made the Libby's pumpkin pie recipe that you can find on the can. This is a little different because I substituted half and half for some of the evaporated milk. It makes the pie not quite as dense. It turned out beautiful and everyone seemed to like it. Although I must say I didn't even taste it, because pecan pie is the only one for me. :) 

Pumpkin Pie
adapted from Libby's Famous Pumpkin Pie
3/4 cup granulated sugar
1 tsp ground cinnamon
1/2 tsp salt
1/2 tsp ground ginger
1/4 tsp ground cloves
2 large eggs
1 can (15 oz.) pumpkin puree
1 small can (5 fl. oz.) evaporated milk
1 cup half and half
1 unbaked 9-inch deep-dish pie shell or My Pie Crust
Whipped cream (optional)

1.  Mix sugar, cinnamon, salt, ginger and cloves in small bowl; set aside.
2. Beat eggs in large bowl. Stir in pumpkin and sugar-spice mixture. Gradually stir in evaporated milk and half and half.
3. Pour into pie shell. Bake in preheated 425° F oven for 15 minutes. Reduce temperature to 350° F; bake for 40 to 50 minutes or until knife inserted near center comes out clean.
4. Cool on wire rack for 2 hours. Serve immediately or refrigerate. Top with whipped cream before serving.

Ready for the oven.

Topped with a little whipped cream.


Cheesy Corn Casserole

I added this dish to my Thanksgiving dinner this year. A little cheese and bacon makes everything better! It originally called for 4 cloves of garlic which I felt was too much so I changed it to 2. This recipe makes a lot! I still have some leftover in the freezer. I used frozen sweet white corn and it was very tasty.

Cheesy Corn Casserole
adapted from saveur.com
4 slices bacon, finely chopped
6 TBSPs butter, cubed
2 cloves garlic, finely chopped
½ cup flour
3 cups milk
4 oz. cream cheese, cubed
2 oz. Velveeta, cubed
2 cups grated extra-sharp cheddar cheese
1 tsp paprika
3 lb. fresh or frozen corn kernels
Salt and pepper, to taste

1. Heat oven to 375°. Heat bacon in a 6-qt. saucepan over medium heat, and cook, stirring, until browned, about 8 minutes. Add butter and garlic, and cook until fragrant, about 1 minute. Add flour, and cook, stirring, for 1 minute.
2. Whisk in milk, and bring to a boil; cook, stirring constantly, until thickened, about 2 minutes. Add cream cheese, Velveeta, cheddar, and paprika, and cook until smooth.
3. Remove from heat and stir in corn; season with salt and pepper.
4. Transfer mixture to a 9″ × 13″ baking dish and bake until top is golden brown and bubbling, about 40 minutes. Let cool before serving.

Thursday, November 21, 2013

Cranberry Orange Sauce

I made this cranberry orange sauce yesterday and it is now patiently waiting in the freezer with my rolls and pie crusts for next Thursday! I tried a little something different, combining what my mom does (orange marmalade) with a recipe I read online (orange juice) and used a little of each. I really like the flavor and extra texture from the little pieces of orange rind in the marmalade. I realized when I got ready to take a pic that I have no pretty little glass bowls! I put it in a tea cup, and have to admit, it's pretty cute. :)

Cranberry Orange Sauce
1/2 cup water
1/2 cup orange juice
1 cup sugar
4 cups (1 12-oz package) fresh or frozen cranberries
1/2 cup orange marmalade

1. In a saucepan bring water, orange juice, and sugar, to a boil, stirring to dissolve sugar. Add cranberries, return to a boil. Reduce heat, simmer for 10 minutes or until cranberries burst.
2. Remove from heat and add marmalade. Stir until combined. Cool completely at room temperature and then chill in refrigerator. Cranberry sauce will thicken as it cools. Keep covered in refrigerator up to a few days or freeze.
 Makes about 3 cups.

Monday, November 18, 2013

Oven Baked Fries

We like to have french fries or tater tots with burgers, BLTs, hot dogs, sloppy joes, anything with a bun really. We end up eating them almost once every week. So rather than buy a 2 dollar bag of frozen tots or fries, I bought a 5lb. bag of potatoes (that I got for $1.28) and made my own. It was an easy enough process and I loved the result. Seasoning plays a huge part in the taste of these since they are basically slices of baked potato, so I added my favorite fry seasoning. Then I went a little further and topped with some cheese. :) Don't forget to spray the foil or they will stick. In order for them to evenly cook they need to be placed in a single layer. I have tried to make 2 large pans and rotate them halfway through baking, but it didn't seems to work well. One of my pans was not as crispy as the other. So just use your largest cookie sheet and cram as many on there as you can. If your potatoes start to turn a little brown before you're done cutting them up, cover them with water until ready to use. Make sure you serve the fries immediately because they won't stay crispy for long. You could also leave the skin on the potatoes if you're into more rustic fries (this pic is skin on).

Oven Baked Fries
2 1/2 lbs. russet potatoes, peeled (or not), and cut into same size fries
2 TBSPs of canola oil
1/2 TBSP salt
1/2 tsp garlic powder
1/4 tsp pepper
1/4 tsp onion powder
Shredded cheese (optional)

1. Preheat the oven to 450 degrees. Line a heavy-duty baking sheet with foil and spray with cooking spray.
2. Place the cut potatoes in a large bowl. Drizzle oil over the potatoes and toss with your hands until evenly coated. Arrange the fries in a single layer on the prepared baking sheet.
3. Bake in preheated oven for 25-30 minutes or until bottoms start to brown. Remove from oven. Using tongs, flip each fry, keeping the potatoes in a single layer. Continue baking until the fries are golden and crispy, 10-15 minutes longer.
4. While fries are baking, combine spices in small bowl.
5. When fries have finished baking, remove from oven and sprinkle with seasoning. If topping with cheese, sprinkle with cheese and return to oven just until cheese had melted. Serve immediately.

Ready to Bake (no skins)

Seasoning 


Thursday, November 14, 2013

Thanksgiving Recipes

I wanted to do a post with all my usual Thanksgiving recipes in one place. It'll make it a little easier for me when I need to find them, AND for my mom and sisters. I'm having my first Thanksgiving without my family this year, but they are having their first Thanksgiving without ME.  :) This is a picture of my plate from last year. Below you will find some of the recipes and a few others that I make.

We'll go clockwise starting at 12.

Cranberry Jello

Candied Yam Soufflé

Cranberry Orange Sauce

Turkey - I've never cooked my own Thanksgiving turkey, but will be this year. We bought an infrared fryer and I'm excited to try it.

Party Potatoes

Gravy - My mom has always done the gravy. This year I will be trying a make ahead recipe that you can freeze.

Rolls - My mom made the one in this pic, but I like to make these Bread Machine Rolls. They are great for leftover turkey sandwiches. I make them a few days ahead of time and freeze them.

Beans - Plain jane green beans, no recipe needed.

Salad - It's hard for me to eat veggies at Thanksgiving when there is so much yummy other stuff. I like having a good salad though. I think that a guest brought this one last year, but I have a few green salad recipes that are great. Strawberry Spinach Salad, Autumn Chopped Salad, Fall Salad with Cranberry Vinaigrette. I'd like to make a salad similar to these but with pomegranate seeds. Maybe I'll try that out too. Update - made it...it was amazing Pear Pomegranate Salad.

And in the center, Cheesy Stuffing Cups. I made it in a baking dish instead of a muffin tin.

Not pictured from this year's plate is Creamed Corn, but it's definitely a favorite!


 Pineapple Cheese Ball We can't forget about this guy! I love this cheese ball. It's a perfect appetizer to set out while you're putting the finishing touches on everything. Also love this super easy appetizer of pepper jelly and cream cheese.


Thanksgiving dessert is like a whole different meal! I looked back through my pics from previous years and found this one from 2011. We always have lots of pie. My favorite is Pecan Pie and it's the only Thanksgiving pie recipe I have on my blog. Of course there is Pumpkin Pie, my SIL makes sweet potato pie, and I make apple pie using canned filling, (it's what the hubby likes). Those are the regulars. I have also made this Pumpkin Sandwich Cake to shake things up a little. Looks like in this pic I made a chocolate tart, macadamia nut pie, and we also had chocolate pecan. I use this Pie Crust recipe and sometimes this easier shortening only recipe here.


Thursday, October 31, 2013

Creamy Tomato Tortellini Soup

I like tasty recipes that take shortcuts. This soup uses canned tomato soup, but with all the additions, you would never guess...well at least my husband didn't. :) The original recipe used refrigerated tortellini, but frozen is cheaper so I used that instead. I got a "This is quite tasty!", which means I will make it again. This was actually the first time I had ever used sundried tomatoes. I bought a little bag of them that I found near the canned tomatoes, chopped them up, and still have enough left to make this again.

Creamy Tomato Tortellini Soup
adapted from mrsschwartzkitchen.blogspot.com 
2 cloves of garlic, minced
2 tablespoons olive oil
2 cans (10-3/4 ounces each) condensed tomato soup
1 1/2 cups milk
2 cups half-and-half
2 cups chicken broth
1/2 cup chopped sun-dried tomatoes or two TBSPs sundried tomato paste
1 tsp onion powder
2 tsps Italian seasoning
1/2 tsp salt
1 19oz pkg frozen tortellini
1/2 cup shredded Parmesan cheese 

1. Sauté garlic with the olive oil in a large stock pot until golden brown. Be sure to keep an eye on it so it doesn't get too brown or burnt.
2. Add tomato soup, milk, half and half, chicken broth, sundried tomato and spices. Bring to a simmer. Once simmering, drop noodles into the soup. Cook according to the package directions.
3. After noodles are cooked, ladle into bowls and top with Parmesan cheese.

Tuesday, October 29, 2013

Meal Idea - BBQ Chicken Flat Bread Pizza

This is more of a meal idea than an actual recipe because I didn't measure ingredients and you can make it so many different ways. I had some leftover BBQ chicken from this recipe here that I needed to use. I bought a package of flat bread pitas to use as my crust. I squirted a little bbq sauce on the pitas and spread it around. Then I sprinkled on my leftover BBQ chicken, some shredded cheddar, and green onion. I baked them on cookie sheets @425 for 10-15 minutes. The pita got nice a crunchy and I loved how easy it was to make!


Monday, October 21, 2013

Fall Brownies - 2 Ways


I took some brownies to a church Halloween party last Saturday. I wanted something that would appeal to kids and adults, so I decided to make 2 different kinds. Both used a boxed brownie mix. I loved the pumpkin cream cheese ones. The others had some fun toppings, and my kids were big fans of those.

Halloween Brownies
adapted from about.com
1 19.5 to 19.8 oz. brownie mix
1/2 cup oil
1/4 cup water
2 eggs
1 1/2 cups miniature marshmallows
1/2 cup candy corn
1/2 cup semisweet chocolate or white chips (or both)

1. Preheat oven to 325 degrees F. Grease an 9 x 9 baking dish.
2. Combine brownie mix, oil, water, and eggs in large. Stir until combined.
3. Pour brownie batter into prepared pan. Bake 30 minutes
4. Remove brownies from oven. Sprinkle mini marshmallows, candy corn and chocolate chips over brownies.
5. Return to oven, and bake another 5 minutes. Let brownies cool completely before cutting into squares. 

Pumpkin Cream Cheese Brownies
adapted from about.com
4 oz. cream cheese, softened
3 heaping TBSPs canned pumpkin puree
3 TBSPs sugar
1 19.5 to 19.8 oz. brownie mix
1/2 cup oil
1/4 cup water
2 eggs

1. Preheat oven to 325 degrees F. Grease an 8 x 8 baking dish.
2. With an electric mixer, beat cream cheese, pumpkin and sugar until smooth. Set aside.
3. Combine brownie mix, oil, water, and eggs in large. Stir until combined.
4. Pour brownie batter into prepared pan.
5. Drop spoonfuls of pumpkin cream cheese mixture onto brownie batter. With a knife, swirl cream cheese mixture into brownie batter.
6. Bake 40-45 minutes until just set.

I try to use this platter whenever I can in October!

This is the mix I used.

Friday, October 18, 2013

Mini Pumpkin Muffins

So many fall recipes, so little time! I made these mini pumpkin muffins last week. I wanted to make a quick and easy pumpkin treat. My kids like to eat these for snacks.

Mini Pumpkin Muffins
adapted from shugarysweets.com
1/4 cup unsalted butter, softened
1/2 cup sugar
1 large egg
1/2 tsp vanilla extract
1/2 cup canned pumpkin puree
1 cup flour
1/2 tsp baking powder
1/2 tsp baking soda
1/4 tsp salt
1/2 tsp allspice
1/2 tsp ground cinnamon

 1/4 cup granulated sugar
3/4 tsp ground cinnamon
3 TBSPs unsalted butter, melted

1. In a mixer, blend butter and sugar until creamy. Add in egg and vanilla, beat until combined. Blend in pumpkin puree. Add flour, baking powder, baking soda, salt, allspice and cinnamon.
2. Fill cavities of a greased mini muffin pan about half full (about 1 TBSP). Bake in a 375 degree F oven for 10 minutes. Remove and cool on wire rack.
3. Meanwhile, mix cinnamon and sugar and a small bowl. In a separate bowl, melt butter. Dip each muffin top into the melted butter then into the cinnamon sugar mix. Repeat until all muffins are dipped. Store in an airtight container for up to one week. Or freeze for up to one month.
Makes 24

Sunday, October 6, 2013

Slow Cooker Chicken and Gravy

I saw this on Pinterest and it the picture caught my eye. I made the recipe and tried to replicate the plating by serving it over Texas Toast with corn on the side. I really liked it. The hubby said it was a bit bland (he needed more pepper), but my kids ate it, so it passed the test.
 
Slow Cooker Chicken and Gravy
themagicalslowcooker.com
1lb. boneless skinless chicken breasts
2 pkts dry chicken gravy mix (0.87oz ea)
1 can cream of chicken soup (10 3/4oz )
2 cups of water
1/8 tsp black pepper

1. Put the gravy packets, cream of chicken soup, water and pepper in your slow cooker.
2. Whisk until the gravy is as smooth as you can get it.
3. Add the chicken breasts
4. Cook on low for 8 to 10 hours
Serve over mashed potatoes or rice.
Makes about 6 servings

Monday, September 30, 2013

Chocolate Salted Caramel Cupcakes

These are the cupcakes I made myself for my birthday. :) I tried a new chocolate cupcake recipe that I really liked. The batter was very thick, but the cupcakes turned out moist. They also had a nice shape after I baked them. It's an interesting recipe because you let the batter sit for at least an hour, so make sure you leave time for that. I refrigerated mine for about 6 hours. I immediately put it into a cupcake tin and baked it. I got the idea for the frosting from a cookbook and just used store bought caramel ice cream topping instead of making my own caramel. I added a tiny sprinkle of coarse sea salt on the top and tada! I loved the end result! My brother and SIL were visiting and the cupcakes got their approval too. :)

Chocolate Salted Caramel Cupcakes
Chocolate Cupcakes
beantownbaker.com
2 oz unsweetened chocolate, chopped
1/4 cup Dutch-process cocoa powder
1 cup sugar
1/2 cup butter, cut up
1/3 cup water
1/2 cup milk
1 egg
1 egg yolk
1/2 tsp vanilla
1 cup flour
1 tsp baking powder
1/2 tsp baking soda
1/2 tsp salt

1. In a heatproof bowl, combine chocolate and cocoa powder.
2. In a saucepan over medium heat, heat the granulated sugar, butter, and water, stirring occasionally, until the butter melts and the sugar dissolves. Pour the butter mixture over the chocolate and whisk until the chocolate melts and the mixture is smooth.
3. Whisk the milk, egg, extra yolk, and vanilla into the chocolate mixture until combined.
4. In a bowl, stir the flour, baking powder, baking soda, and salt until blended. Add the flour mixture to the chocolate mixture and whisk until smooth.
5. Let the batter sit at room temperature for 1 hour or cover and refrigerate for up to 3 days.
6. Line a standard 12-cup muffin tin with paper liners. Preheat the oven to 350 degrees. Divide the batter among the muffin cups. Bake for 20-25 minutes or until the tops spring back when pressed lightly with a fingertip. Set on a wire rack and leave to cool completely.

Salted Caramel Frosting
adapted from The Cupcake Diaries
1 cup butter, softened
4 cups powdered sugar
1 tsp milk
1 tsp salt
1/2 cup caramel ice cream topping plus additional for drizzling (I used Smuckers in the jar)
Coarse sea salt for garnish

1. Add butter, powdered sugar, milk, salt, and 1/2 cup caramel topping to the bowl of a stand mixer and mix on high until light and airy.
2. Pipe frosting onto cupcakes. Drizzle with a little caramel topping. Sprinkle each cupcake with just a dash of coarse sea salt.


Sunday, September 15, 2013

Oreo Cupcakes

We are very big Oreo fans, and these cupcakes are pretty amazing. I've made Oreo cupcakes before and had hoped to post them, but they weren't quite what I had wanted. I did a little recipe research and decided to make these yesterday and they are definitely winners. This is a dense cupcake, which I LOVE! I had some double stuf Oreos that I bought accidentally so I ended up using some of those. The original recipe has the crushed Oreos sprinkled on the top, but I mixed mine in the frosting. In the recipe process, it seemed kind of strange to me to cream the butter and add the milk and vanilla instead of the sugar. The butter and milk just don't mix very well together, but you end up beating everything at the end for a few minutes so it doesn't really matter. After they bake, they'll be just below the tops of the papers, but look amazing after you pipe on the frosting,

Oreo Cupcakes
adapted from beantownbaker.com
1 pkg Oreo Cookies (36 cookies)
2 1/4 cups flour, plus 2 TBSP for the Oreo chunks
1 tsp baking powder
1/2 tsp salt
1 stick unsalted butter, at room temperature
1 cup milk
2 tsp vanilla extract
1 2/3 cup sugar
3 large egg whites, at room temperature

1. Preheat oven to 350F. Insert 24 liners into tins.
2. Twist apart 24 Oreos. Place the wafer with filling on it, filling side up, in the bottom of each paper liner. Cut other wafers in half. Save 24 halves to place in the frosting. Crush the other wafer halves to mix into frosting. Set aside.
3. Cut the remaining 12 Oreo cookies into quarters with a sharp knife. Toss with 2 TBSP flour and set aside.
4. In a medium bowl mix together the flour, baking powder, and salt.
5. In a large mixing bowl cream the butter until fluffy, about 3-5 minutes. Add the milk and vanilla and mix to combine.
6. Add the dry ingredients to butter mixture. Mix until integrated. Stir in sugar. With an electric mixer on low speed, beat for 30 seconds. Turn the mixer up to medium speed and beat for 2 minutes. Add the egg whites. Beat for 2 more minutes. Stir in the quartered cookies.
7. Fill the cupcake liners 3/4 full (I use a large scoop that holds 3 TBSPs.) Bake for about 20 minutes or until a toothpick inserted in the center of cupcakes comes out clean. Cool cupcakes completely in the pan.

Oreo Cream Cheese Frosting
8 oz cream cheese at room temperature
1/2 butter at room temperature
1/2 cup shortening
2 tsps vanilla
7 cups powdered sugar
2 TBSPs milk
1/2 cup crushed Oreo wafers

Place the cream cheese in the bowl of your mixer. Beat on medium-high until completely smooth, 3-4 minutes. Add the butter and shortening and continue to cream until fluffy. Add vanilla extract. Add powdered sugar and mix until incorporated, scraping down sides as needed. Beat on medium-high for 2 minutes. Mix in reserved crushed Oreos. Pipe or spread onto cupcakes and top with 1/2 Oreo wafer.


Note to self: After making these for a 2nd time I changed the amount of cookies inside the batter. A 14.3oz. pkg of oreos has 36 cookies. Original recipe called for 45 cookies which I guess is a family size pack? 12 oreos quartered is enough though. *2/6/16 Changed frosting recipe to add shortening. MUCH BETTER.

Thursday, September 12, 2013

Buttery Buttermilk Biscuits

I have been looking for a good fluffy biscuit recipe for awhile now. I have tried many that turn out like rocks. These are fluffy and buttery and I loved them! We had them with eggs, bacon, and gravy for a meal. Then the next day I had one for my lunch (yes) with homemade jam...YUM! Just typing this makes me want to go bake some more. I followed the original recipe almost exactly, except I used regular flour, baking powder, and upped the salt, instead of using self rising flour because I don't really ever buy it. I used a grater to shred my cold butter and it worked really well. My biscuit cutter is 2 1/2 inches and I got almost 8 full sized biscuits from the recipe. I recommend checking your biscuits at 10 minutes, but baking till golden. It was about 15 minutes for me.

Buttery Buttermilk Biscuits
adapted from carnaldish.com
2 cups flour
3 tsps baking powder
1 tsp salt
1 TBSP sugar
5 TBSPs cold butter, cut into cubes (or use a cheese grater)
2 TBSPs cold shortening
1 cup cold buttermilk, plus an extra 3 TBSP if needed
2 TBSP melted butter for brushing on top

1. Preheat your oven to 450 degrees. Line your baking sheet with parchment paper, silpat, or aluminum foil, dull side up.
2. In a large bowl, mix the flour, baking powder, salt, and sugar together until combined. With a fork or pastry blender, cut the butter and shortening into the flour mixture until each piece is coated and the size of small peas. Make a well in the center of the flour and pour in one cup of the buttermilk. Gently mix it around until it's combined. If the dough doesn't look wet, add in the extra 3 TBSPs of buttermilk to moisten it. You don't want it runny, just visibly moist.
3. Flour your surface and gently place your dough on top. Dust the top of the wet dough with a little more flour ensuring that your fingers don't stick into the dough. Bring the dough together with your hands, gently, for about 10 seconds. Flatten into a 1- 1 ½ inch thick circle. Cut dough into biscuits using a floured glass or biscuit cutter (I used a 2½ inch). Do not twist cutter when cutting; this crimps the edges of the biscuit and hinders rising.
4. Place each biscuit on the lined baking sheet, so that the sides are barely touching. Bake for 10 to 12 minutes or until golden brown. Remove from the oven and brush with melted butter.

 Dough should look a little wet.

 I got 7 biscuits and 1 runt from the recipe.

 Ready to eat!

 Fluffy Insides


Thursday, September 5, 2013

Lemon Angel Hair with Chicken and Spinach

This recipe has lots of lemon flavor! It fed my family of 6 with just a tiny bit leftover. The original recipe calls for angel hair pasta, but you could actually use any type of pasta that you like. I used the perfect chicken recipe for the chicken in this dish, and I think that it added a lot to the flavor. You get tart lemon, creamy sauce, and salty chicken and it all tastes amazing together. Also, the spinach makes it healthy, right? :)

Lemon Angel Hair with Chicken and Spinach
adapted from therecipecrayonbox.blogspot
1/2 lb angel hair pasta
4 cloves of garlic
1/2 tsp crushed red pepper flakes
1 1/2-2 cups cooked chopped chicken (or Perfect Chicken)
2 lemons, zested and juiced
3/4 cup half-and-half
1 cup Parmesan, shredded (divided)
1 cup baby spinach, stems removed
3 TBSPs extra virgin olive oil

1. Bring a pot of water to a boil. Salt the water well, cook pasta according to package directions. Reserve 1/4 cup pasta water.
2. While pasta is cooking, heat a large skillet over low heat. Add oil, garlic, and crushed red pepper. Cook until the oil sizzles (about 7-10 minutes). Add lemon juice, half-and-half, and 1/4 cup of pasta water to the garlic oil mixture. Raise the heat to medium and heat until the sauce begins to bubble.
3. Add the pasta, zest, and 1/2 cup Parmesan to the cream sauce. Toss for a minute or two. Add chicken and spinach, and toss until well distributed. Top with remaining cheese.

Perfect Chicken

This is one of those recipes I pinned and have been wanting to make. It's pretty darn good! I doubled the original recipe because I have 6 people in my family, so 2-4 chicken breasts wasn't going to cut it. If your chicken breasts are on the large size, you can cut them in half. You might even want to pound them a little with a tenderizer to make them even in thickness. I usually use frozen breasts, which is what I did in these pics. I just thawed them in the microwave and then followed the directions. Also, I don't have a dutch oven, so I just cooked them in a frying pan and transferred them to a baking dish. The whole reason I made this chicken in the first place was to try this recipe here. We liked it so much I wanted to try the chicken on it's own, and it really is good. In this pic I also make my homemade rice-a-roni. I cooked the rice in the pan I browned the chicken in, which added more flavor to the rice.

Perfect Chicken
adapted from therecipecrayonbox.blogspot.com
4-8 boneless chicken breasts
1 tsp salt
1 tsp pepper
1 tsp garlic powder
1 tsp onion powder
1 tsp paprika
2-3 TBSPs olive oil (I used canola)

1. Mix salt, pepper, garlic powder, onion powder, and paprika in a small bowl. Sprinkle the chicken breasts with the seasoning, rubbing in to coat.
 2. Pour oil in the bottom of a Dutch oven, and heat to med-high. When nice and hot, add chicken to the pan (in batches if necessary). Cook 2-3 min per side. If any chicken has been removed, add it back to the Dutch oven. Place uncovered Dutch oven in a 350 degree F oven for 25 minutes or until juices run clear. Let sit on a plate 5-10 minutes before cutting, shredding, or eating.


Friday, August 30, 2013

No Bake Peanut Butter Chocolate Bars

Even though it doesn't get very hot in the Seattle area in the summer, it still heats up my house when I turn on the oven. And without an air conditioner, I can't cool it off. I have really been trying not to use the oven on warm days. These are just the kind of summer dessert that I can make and they really couldn't be any easier.

No Bake Peanut Butter Chocolate Bars
allrecipes.com
1 cup butter or margarine, melted
2 cups graham cracker crumbs
2 cups powdered sugar
1 cup peanut butter
1 1/2 cups semisweet chocolate chips
1/4 cup peanut butter

1. In a medium bowl, mix together the butter or margarine, graham cracker crumbs, powdered sugar, and 1 cup peanut butter until well blended. Press evenly into the bottom of an ungreased 9x13 inch pan.
2. In a metal bowl over simmering water, or in the microwave, melt the chocolate chips with the peanut butter, stirring occasionally until smooth. Spread over the prepared crust. Refrigerate for at least one hour before cutting into squares.

Monday, August 19, 2013

S'mores Pie

LOVED this pie! Loved everything about it! The chocolate filling was sooo good. I've made it twice in eight days. :) It was very easy. If you like s'mores you have to try this. I used my own recipe for graham cracker crust here. I also recommend checking the pie after it has baked for 20 minutes, and if it is still not set then bake it for up to 10 more. Watch the marshmallows carefully in the broiler so they don't burn.

S'mores Pie
adapted from gimmesomeoven.com
3/4 cup heavy cream
3/4 cup milk
10 ounces semisweet chocolate, chopped
1/2 tsp vanilla extract
Pinch of salt
2 eggs, whisked
20-30 large marshmallows

1. In a medium saucepan, whisk together cream and milk. Warm over medium-low heat. Add in chocolate and pinch of salt. Whisk until chocolate has completely melted and is smooth. Slowly add in vanilla and whisked eggs, and whisk until smooth. Pour chocolate filling into baked graham cracker crust.
2. Bake at 325 degrees for 20-30 minutes, or until chocolate filling is set and does not jiggle when pie is lightly shaken. Remove from oven.
3. Using kitchen shears or a knife, cut marshmallows in half. Place halves over the top of the pie until covered.
4. Lower oven rack to the middle position, and set oven to the lowest broil setting. Place pie on the rack and lightly toast the marshmallows until golden. You can also use a kitchen torch to toast the marshmallows instead. Chill pie in the refrigerator to set for 2-3 hours. Or it can also be served slightly warm. Drizzle with chocolate sauce if desired.


Saturday, August 17, 2013

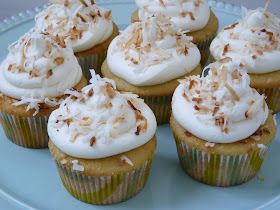
Coconut Cupcakes

I made these cupcakes for my mother-in-law who came to visit on her birthday. She has a whole pinterest board dedicated to coconut, so I knew she would like these. These cupcakes have great coconut flavor! They are not the most beautiful, but they taste amazing. My cupcakes turned out kind of flat, so when I make them again I will use exactly one large scoopful of batter (3 TBSPs) for each cupcake so that they don't go over the sides like my picture at the bottom. BUT, put some frosting on top and you can't even tell. This recipe made 24 cupcakes plus a little extra, so I used the extra batter to make some mini ones too. I read a lot of coconut cupcake recipes before deciding to make this one. I chose this one because it does not have any flaked coconut in the cupcake. My husband does not like the texture of coconut, so I was able to just leave the garnish off of his. They are instead flavored with coconut extract, which is found in the baking aisle, and cream of coconut, normally used for piña coladas. The frosting I used is adapted from my previously posted cream cheese frosting.

Coconut Cupcakes
adapted from tideandthyme.com
1 cup butter, room temperature
1 1/2 cups granulated sugar
4 eggs, room temperature
1 tsp vanilla extract
1/2 tsp coconut extract
2 1/2 cups flour
1 tsp baking powder
1/2 tsp baking soda
1/2 tsp salt
1/2 cup buttermilk
1/3 cup cream of coconut
1 cup sweetened, shredded coconut (for garnish)

1. Preheat the oven to 325 degrees F. Line 2 cupcake tins with paper liners and set aside.
2. In a small dry skillet, toast the shredded coconut over medium-high heat until starting to brown on the edges. Turn off heat, and remove from pan to a plate to cool.
3. In the bowl of an electric mixer fitted with the paddle attachment, cream the butter and sugar on high speed until light and fluffy, about 5 minutes. With the mixer on low speed, add the eggs, 1 at a time, scraping down the bowl after each addition. Add the vanilla and coconut extracts and mix well.
4. In a separate bowl, sift together the flour, baking powder, baking soda, and salt.
5. In a liquid measuring cup, combine the buttermilk and the cream of coconut – whisk to combine.
6. In 3 parts, alternately add the dry ingredients and the buttermilk to the batter, beginning and ending with the dry. Mix until just combined.
7. Scoop batter into prepared tins. Bake for 25 to 30 minutes, until the tops are golden and a toothpick comes out clean. Allow to cool in the pan for 15 minutes. Remove to a baking rack and cool completely. 

Coconut Cream Cheese Frosting
1/2 cup softened butter
4 oz softened cream cheese
1/2 tsp vanilla extract
1/2 tsp coconut extract
5 cups powdered sugar
1-2 tsps milk (if necessary)

1. Place butter, cream cheese, vanilla and coconut extracts in a mixing bowl and mix on high for 5 minutes, scraping down sides as needed.
2. Gradually add powdered sugar. Once it is just mixed, turn the mixer to high and mix for 5 minutes.
If it is a little too stiff, add 1-2 tsps of milk and mix in.

Frost the cupcakes as desired and sprinkle with the toasted coconut to garnish.