This year was just the worst. I decided the worst year deserved a special dessert to follow Christmas dinner, so I made my first ever Yule log aka bûche de Noël. A Yule log is a thin sponge cake rolled up with a cream filling and decorated to look like an actual log. I based my creation on a couple different recipes, and have combined them here just in case I endeavor to make this again or even turn it into a yearly tradition. I made this over 2 a day period. The first day I made the cake and filling, rolled it up, covered it, and refrigerated it overnight. I also started the cranberry and rosemary garnish. The next day I made the frosting and mushrooms, finished the garnish, and assembled everything. It's quite a time consuming dessert, and I had a few little helpers which was nice. I absolutely love how it turned out. It might be the most beautiful dessert I've ever made. See a few helpful notes and more pictures following the recipe.
CSS
Monday, December 28, 2020
Chocolate Yule Log with Mascarpone Cream Filling and Peppermint Meringue Mushrooms
Wednesday, October 28, 2020
Pigs in a Blanket 2.0
Monday, October 5, 2020
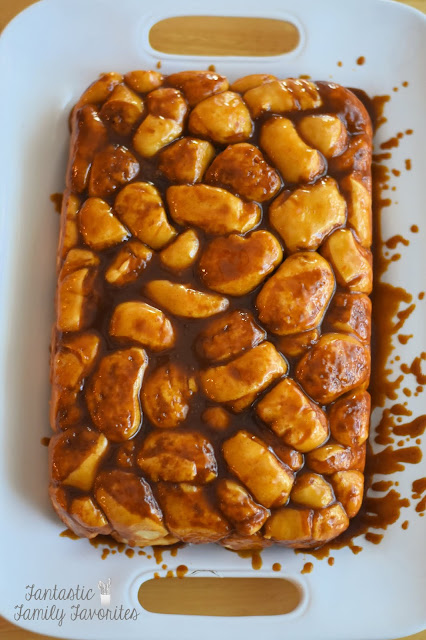
Sticky Cinnamon-Sugar Monkey Bread
My daughter works at a sandwich shop and some nights she brings home extra bread dough. This is one of the things I like to make with that dough. It's super easy and yummy. The recipe calls for 2 pounds of frozen dough. Rhodes Bake n Serve White Bread dough works well for this. I have tried it with vanilla and butterscotch pudding and they are both great. This picture is with the butterscotch pudding.
Wednesday, September 30, 2020
Best Pumpkin Bread
I decided I wanted to try a new pumpkin bread recipe, but I didn't have to make a bunch of different loaves to find the best one, because there's a blogger that already does that! I read The Pancake Princess's pumpkin bread bake-off post and baked her winner. It comes from seriouseats.com and apparently is the pumpkin bread recipe for the San Francisco bakery Tartine and is actually called Pumpkin Tea Cake. It has great spice flavor and a fun crispy sugary crust on top. If you like chocolate chips in your pumpkin bread, don't be afraid to throw some in!
Best Pumpkin Bread
Monday, August 17, 2020
Rustic Strawberry and Peach Galette
Friday, August 14, 2020
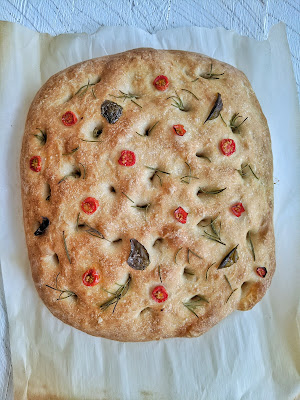
Focaccia
During the first days of quarantine, I was obsessively watching bake-along videos on Instagram. One of the Instagram accounts that I have diligently watched is Bread Ahead. They are a London Bakery and are famous for their doughnuts. I visited the bakery a few years ago and had one of those delicious doughnuts. I learned how to make them in a Zoom class recently too! The owner Matthew demonstrates how to make many of the items they sell in their shop on his Instagram account. I saved all the videos and have made quite a few of the recipes. One of the recipes I tried and fell in love with was the Focaccia. I have a great big rosemary plant in my garden and it's fun to snip some off for this bread. The recipe is special because it's a no-knead version. Instead of kneading, you fold the dough. Matthew shows his special folding technique on Instagram. I tried to describe it in words in the recipe, but I recommend watching him. Here is the link to Bread Ahead's original recipe and video on Instagram. The main change I made is that I use instant yeast instead of fresh yeast (you can't really find fresh here in the grocery store) and because I changed it to dry, the initial rise time is a little longer. I have also converted the recipe to standard American measurements.
Tuesday, July 7, 2020
Sweet Zucchini Relish
adapted from manmadediy.com
12 cups zucchini, shredded
4 cups white onions, shredded
1 red bell pepper, diced
1 carrot, shredded
5 TBSP pickling salt
5 cups of sugar
2 1/2 cups vinegar
1 TBSP dry mustard
1 TBSP corn starch
3/4 tsp turmeric
1/2 tsp celery seed
1/2 tsp black pepper
1 TBSP red pepper flakes, optional
10-8 oz jars with screw bands and lids
1. Mix the veggies and pickling salt in a large bowl. Let sit at least 12 hours (or overnight). Drain the veggies in a colander; wash under cold water, then drain again thoroughly. Set aside.
2. In a large pot add sugar, vinegar, mustard, corn starch, turmeric, celery seed, pepper, and red pepper flakes. Simmer until slightly thickened, about 20 minutes. Add veggies to sauce and cook over low/medium heat for 25-30 minutes.
3. While relish is cooking, heat water in water bath canner or large pot to boiling. Place lids with rubber seal in a small bowl and add 1 cup of boiling water. Add empty jars and screw bands to the pot and boil for 10 minutes to sterilize. Remove jars and screw bands from pot and dry them with towel. When relish is ready, ladel it into the clean jars. Leave 1/4 - 1/2" of space at the top. Wipe jar rims and threads with a clean damp cloth. Cover with lid and screw bands on tightly. Place the filled jars into the canner. Water should cover jars by 1-2 inches. Bring to boil and process for 10 minutes. Carefully remove each jar and set aside for 12-24 hours to cool. Check tops of jars to make sure they have sealed by pressing middle of lids with finger. If lids do not spring back they have sealed properly. If they do spring back, refrigerate the jars. Makes about 10-8oz jars.
Monday, June 29, 2020
Banana Cream Pie
1 9 inch graham cracker crust (this is the recipe I like)
¾ cup sugar
¼ cup cornstarch
2 cups half and half
4 egg yolks
3 TBSPs butter
1½ tsps vanilla extract
2 large bananas, sliced
1½ cups heavy whipping cream
½ cup powdered sugar
½ teaspoon vanilla
1. In medium sauce pan, combine sugar and cornstarch. Add half and half and egg yolks and whisk until well combined. Bring to boil over medium heat, stirring constantly until thick. Boil 1 minute and remove from heat. Stir in butter, and vanilla.
2. Pour ½ of the filling into the crust. Top with sliced bananas to cover the filling. Pour the rest of the filling over the bananas. Cover with saran wrap directly on the filling itself to avoiding a sticky film on top. Chill for at least 3 hours. Top with another layer of sliced bananas.
3. In a medium mixing bowl, beat whipping cream, powdered sugar, and vanilla at high speed until stiff peaks form. Spread whipping cream over the top of the bananas and then garnish with a few more slices of bananas. Serve.
Friday, June 5, 2020
Fried Zucchini
2-3 cups of canola oil (you want it to be about 2 or 3 inches deep in your pan)
3/4 cup flour
2 eggs
1/2 cup milk
Salt and pepper to taste
½ cup grated Parmesan cheese
2 cups Italian bread crumbs
1. Heat oil in pan or deep fryer to 350 degrees.
2. While oil is heating up, wash zucchini and slice into ½ inch slices.
3. In a shallow dish like a pie pan, add flour. Set aside.
4. In a separate shallow dish, whisk eggs. Add milk and salt and pepper to taste. Set aside.
5. Combine Parmesan cheese and bread crumbs in another shallow dish. Set aside.
6. Dredge zucchini in flour, dip in eggs, then cover in bread crumbs. Make sure to really cover the zucchini slice each time. Pack the bread crumbs on a little if you need to. Repeat with remaining slices.
7. Fry zucchini a few at a time cooking 2-3 minutes per side. Remove to paper towel lined plate.
Friday, May 1, 2020
No Bake Granola Bars
1 1/2 cups oats, quick or rolled
1 cup rice crispy cereal or any other cereal crushed up a little bit
1/4 cup butter
1/4 cup honey
1/2 cup brown sugar
1/2 tsp salt
1/2 tsp vanilla extract
Add in suggestions:
Raisin Nut Granola Bar
1/4 cup shredded coconut
1/3 cup chopped raisins
1/3 cup chopped nuts (toasted nuts are also great)
Peanut Butter and Jelly Granola Bar (see note at bottom)
1/3 cup peanut butter (stirred in with sugar mixture)
1/3 cup chopped peanuts
6 TBSPs your favorite jam
Chocolate Chocolate Chip Granola Bars
1/4 cup unsweetened cocoa powder (stirred in with sugar mixture)
3/4 cup mini chocolate chips
Monster Granola Bars
1/3 cup peanut butter (stirred in with sugar mixture)
1/3 cup mini m&ms
1/3 cup mini chocolate chips
1. In a large bowl, mix together the oats and cereal.
2. In a medium microwavable bowl add in butter, honey and brown sugar. Microwave this mixture for 2 minutes. It will bubble up so make sure your bowl is big enough so it doesn’t overflow. You can also do this step in a saucepan if you don’t have a microwave.
3. Add the vanilla and salt to the sugar mixture and stir. This will bubble a little bit. (If you are adding peanut butter or cocoa powder this is where you put it in. Stir the PB or cocoa into the sugar mixture) 4. Pour the sugar mixture over the oats and cereal, and thoroughly stir using a rubber spatula. Mix the ingredients together until the oats and cereal are completely coated.
5. Add in your desired mix-in. If you are adding chocolate chips or m&ms and don't want them to melt, wait a few minutes before stirring them in.
6. Press the bars very firmly into a parchment lined 9″x 9” pan. If you like your bars thicker, you can use a smaller pan. If you do not press firmly enough, the bars will fall apart when you eat them. You can also sprinkle on some of your add ins on top like mini chocolate chips or m&ms and press those down so they stick to the top.
7. Place them in the fridge for at least 30 minutes then cut to size.
Store in an airtight container in the fridge or on the counter. If you keep them in the fridge they will be a little hard and chewy. At room temp they will be soft.
PB and J Note: It's best to layer these bars. I have stirred the jam in and they are a little too soft this way. So press half the mixture into the bottom of your pan, then spread on your jam, and press the other half on top.
Wednesday, April 15, 2020
Cheese Popovers
3 large eggs
2 large egg whites
1 3⁄4 cups whole milk
1 3⁄4 cups all-purpose flour
2 tsps sugar
2 tsps kosher salt
1⁄4 tsp black pepper
1 1/2 cups any kind of cheese you have, shredded
1. Heat the oven to 425°F. Grease a 12-cup muffin pan. Measure all of the ingredients except the cheese into the pitcher of a blender. Blend on medium-low until smooth and well combined. The batter will be thin.
2. Pour 1⁄3 cup batter into each cup. Each cup should be about 3/4 full. Scatter 2 TBSPs of shredded cheese evenly over the center of each of the filled cups.
3. Put the popovers in the oven and bake for 25-30 minutes, until tripled in size, hollow in the center, and a healthy golden brown on the outside. DO NOT open the oven while baking.
4. Pop out of the pan and dig in immediately. Popovers are best warm out of the oven, or the same day at the very latest.


.jpg)


